
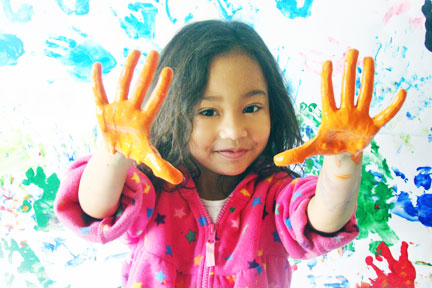

It’s been a few days since I have published a blog post, but not to worry everything is just fine. I guess time flies by when your having fun. Now, it’s time for another fun kid friendly craft. If you already noticed in our previous craft post, we had made some wonderful colorful hand prints on a pillowcase. Sophia had so much fun that she wanted to do it again. But instead of making them on a pillowcase, we made it on a large roll of paper. Now, let’s begin our fun Hand Print Wrapping Paper craft.
Supplies:
- Paint
- Roll of Paper
- Tape or tacks
- Lids or plastic plates
- Newspaper
- Bowl
- Towel
- Gifts
First, you need to find an area you want to do your finger painting project. Since this is quite messy, I would suggest that this be an outdoor project. We decided to do it all in the garage. With the help of Sophia, we taped a large piece of paper against the wall. We ended up with 2 rows, which was the perfect height and length for her to do all of her finger painting.


Now, start by laying on the floor some newspaper, so it won’t spill on the concrete. Even if some does spill, you can easily wash it off. Now reach for your plastic plates, or in my case I used lids from my plastic boxes, which turned out really well, and place them in a row. Get all of your paint colors ready, and pour them on the lids. Sophia really enjoyed this part, and had the biggest smile on her face.

Now that we have everything in place, Sophia was ready to start her finger painting project. She literally splashed her hands in the paint color and started to rub her hands together. Then, she started to press her hand prints all over the paper wall. Wow, what a fantastic hand print it was, and her smile was as huge as her hand print.


She continued to the same process with all the remaining colors, washing and drying her hands in between colors. The same process was done with her foot prints. It all screamed fun, fun, fun!


After we were done, it was time to let everything dry and to clean up all that mess. LOL. Sophia was a nice helper and helped wash off all the lids, and setting them outside to dry in the sun. Now after everything had dried, we took off the paper from the wall and then wrapped our gift. This will be the perfect wrapping paper for a birthday party. Not only did Sophia have fun finger painting but she also designed her very own wrapping paper. Isn’t that wonderful!

Now, have fun and make your own unique Hand Print Wrapping Paper for any special event your children may be attending. Enjoy!

Sincerely,


22 Comments
Love it, got to try it:)
I totally LOVE this. I love that you went to the garage as well. This is an absolutely adorable idea that we will be doing in the future. Thanks so much!
That’s just too adorable. Nice personal touch!
I love to do this! Your kids must have so much fun with you, LOL
WOW! What a neat idea and so much fun too! Thanks for sharing!
What a really neat idea!
Love this idea! And the site is beautiful!
How cute and fun! Following back from Mommy’s Peanut Gallery 🙂
You always come up with the greatest projects! This is so cute!
oh my goodness how cute! I can’t wait until my daughter is old enough to try things like this with!
Thanks for stopping by and following me on twitter! I love your blog and I think this is a great idea!!!!! i would love to use some of your ideas on my blog at some point!
Awh, what an awesome idea!! 🙂 Looks like she had fun with it too!
Really cute idea and such fun for the kids to create! Thanks for becoming a follower of mine! 🙂
Hi there, following you back now! Thanks for leaving me a nice comment on my paper flower tutorial! I love this idea for wrapping paper!
Thank you for following my blog, I am now a follower of yours too!
Cute idea–my daughter would LOVE doing this! When the weather warms up this might be an outdoor activity for us =)
Ahhh, I LOVE it! That is so awesome! It looks like she had a blast!
I absolutely love this idea. Great photos too. Wat a wonderful personal touch to add to a gift!Thank you for being a follower of Katherines Gifts. I recently merged the blog and the website into GiftsByKatherine.com. I extend my hand and invitation for you to join me there. Wishing you a lovely weekend. Hugs from Katherine
What an awesome idea! And I know the grandparents would love it from their babies!!
^ Totally agree, this would be a great wrap for gifts for the grandparents. Cute way for kids to also learn about colors and maybe even color schemes… plus it looks like a ton of fun!
Such a cute idea, what a fun way to wrap a gift! Thanks so much for stopping by and visiting my blog!I’m your newest follower.
great idea! so cute!
check out my blog and enter the goldcanyon giveaway!http://talesofmommyhood.blogspot.com/2011/03/giveaway-gold-canyon-candles.html