
 I am back and ready for some new posts. I must say I have been very busy around the house with the family. As most you know, I love to sew and if I see a pattern that I truly love I will definitely try to make it. I have been working on several sewing projects and decided that I would show you all how to do it by giving you a little tutorial.
As we were cleaning out our closet and doing some spring cleaning, I noticed that my husband had quite a few shirts that were in good condition that he did not want anymore. So I decided that I could turn those shirts into something special. My son just turned 9 months old and he tends to wear bigger sizes, so it is very hard to find sizes that would fit him just right around the waist. He is such a healthy little boy and I thought I could turn Daddy’s shirts into lovely, adorable, practical crawling infant pants. A great idea, right. Now let’s begin the the tutorial.
Materials that you will need: (Note-some images are different but you can easily figure it out)
- Sewing Machine
- Serger (optional) or you can use zig zag stitches for the edges)
- Thread
- Other infant pants (use as a pattern)
- Scissors
- Old shirt
- 3/4 non -roll elastic
Optional Material for Applique
- Blank T-Shirt
- Digital Applique pattern (football- or any pattern you desire)

You will first make a pattern. Get a pair of pants that fits your your little one and fold them in half. Place your old shirt on your cutting table and straighten it out flat and place the folded pants over the shirt. If you would like to save the pattern use freezer paper or butcher paper, just to have for next time. I know I did because I will be making a lot more pants.
Make sure you add about 1/2 an inch to the sides, and 1 inch or so to the bottom of the legs, and about an inch and half at the (waist) top.
Cut around the entire pants (cut 2). You’re welcome to place it on the fold so you can cut 1, but since your cutting it out of a shirt you need to try to find the right angle and I decided to cut 2 instead of one. You need a total of 4 pieces, so go ahead and cut 2 more pieces. so, far so good.
Second step: Pair the 2 pieces together and lay them right side facing so they will line up and pin. Sew a straight stitch from top to bottom, or if you have a serger you can do it now. Repeat the same process with the other 2 pieces. Now, you will have two complete pieces of patterns.
Place the two pieces of patterns on the right side facing, line them up again and pin. Sew the curves with a 1/4 inch seam allowance and finish the edge by serging or sewing with a zig zag stitch.
When finished, you will have your pant pieces still inside out, you will now bring the seams to the center and pin the inside of the leg pieces together (crotch area). Sew it again with a 1/4 inch seam allowance and finish the edges- I like to sew it twice. We will now go ahead and hem the pant legs. You will fold in 1/4 inch and iron, then another 1/2 inch and iron, then sew in place all the way around. Simple right

Now you will sew your elastic casing. I used my Serger which is easier for me. Once again fold the waist down 1/4 of an inch and iron then fold again 1.5 inch down iron and pin. Simply sew your casing in place at the edge with a straight stitch all the way around, leaving a hole and make sure you do some back stitching at beginning and the end. Now, make sure you measured your child waist and take your 3/4″ no-roll elastic and feed it easily through the casing with a safety pin, all the way around. Push all the gathers nicely and then take your elastic and sew in place and also sew the opening (hole) close.
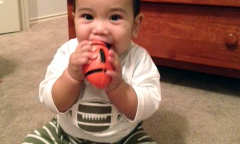
Now, your you have made some cute recycled infant pants. I decided to make an applique shirt for my little man and this way he will have a pant set. I just bought a simple blank shirt from Hobby Lobby and embroidered a nice foot ball applique on it with the matching T-Shirt fabric. There you have it. Looks good right.
I hope you like this tutorial and have fun sewing.
![]()


11 Comments
That is amazing…I am in awe of people who can sew! This is one skill I do not have!
oh, thank you. I love to sew. I pretty much can do it the entire day and i won’t get bored :).
Wow! I am impressed! You make it sound so simple… but I know I couldn’t do it! Haha!
Believe me it is easy, once you get the hang of things. You will start sewing everything and anything you see.
That is really impressive! I’m going to be thinking about this next time i throw out or give away old clothes. It makes me want to learn to sew!
I know what you mean. Hubby told me he will let me know if you doesn’t want a shirt anymore and then I can start making the little one some more pants 🙂
I love this idea! I have wanted to try things like this for our daughter, I’m just not that great at sewing 🙂
Seeing sewing projects “in action” always amaze me. I can’t believe you turned that shirt into pants and a football! My mom is great at sewing but apparently it is not hereditary… Loved reading how you did it though!
Wow – what a creative idea! Your post inspired me and I am going to make a surprise for my daughter when she comes back from school)
I wish I had a talent for sewing!
Very clever and very frugal- I wish more did this it would save so much money!!