

Well it has been quite a while sine I have blogged, but I have a really great reason why. I have been so busy re-decorating my house, and I am having so much fun that I tend to forget that I have to keep up with my blog :). Now, we were trying to sell our current home and find a bigger one, however things have changed and we decided to stick here for a while and make our house as beautiful and liveable as possible.
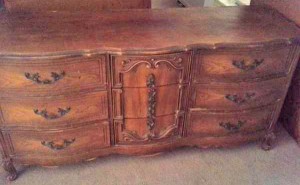
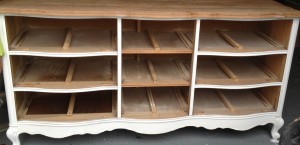
I found this amazing French Provincial Dresser/Buffet. It did not look very pretty when I first laid my eyes upon it, but I knew deep in my heart that I could turn it into something gorgeous. I love the details on this dresser, everything looked beautiful, but it just needed a fresh coat of paint to make it look great. Here is a before picture of it. The top of the dresser was not very pretty, it had a few scratches and the stain that was on it was coming off. Now I was ready to start my project.
With the help of sweet dear husband, he placed the dresser in the garage and took all the drawers out for me. Don’t you love it when you get some help. Here are the supplies that I used on the dresser to make it as pretty as you see it now:
- Dresser
- Annie Sloan Chalk Paint (Pure White)
- Annie Sloan Brush (You can use any good brush, but I chose this one)
- Soft Clear Wax
- Minwax Ebony stain
- Smart Strip
- Minwax Wipe-on Poly
- Lint Free cloth
- Foam Brush
- Putty knife
- Old rag or paper towel
- sanding sponge
Preparing the top of the Dresser:
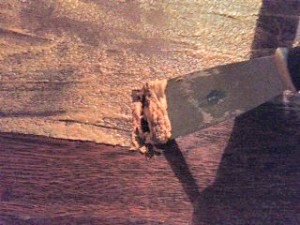
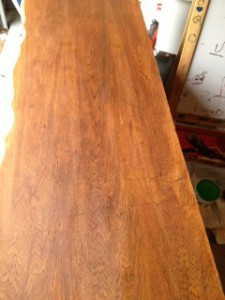
Now that you have seen all the supplies, don’t get discouraged it is so easy to do. First, you need to dust off your entire piece of furniture. I pretty much use a slightly wet towel and end up wiping down anything. Then I started with the top of the dresser applying the Smart Strip. I literally applied it all over the top of the dresser with a foam brush. Then I let it sit for a few hours (or just read the instructions on the container). Of course with two little ones to take care of, I left it there for the entire day and started with it the next morning. The color of the Smart Strip is white, but once it sits on your dresser for a while it will turn into the color of the stain, then you know it is ready to be taken off. The old stain came off so easy with the putty knife, just make sure you have lots of paper towels or old rag to wipe it off. After you are done, clean it with some soapy water and scrub the remainder with your sanding sponge. When your done you will let it dry, and then you will see how pretty your wood will look. That’s my favorite part.
Staining:
It is time to stain the top of the dresser. I applied 2 coats of Minwax Ebony stain and let it dry for a day or so.
Painting the Dresser and Drawers:
First, I removed all the handles from the drawers and placed them in a safe place. Next I painted the entire dresser and drawers at the same time using Annie Sloan Chalk Paint. It does not have an odor, and you do not have to prime or sand your furniture. You can paint over it immediately. It really saves you a lot of time, and having a baby I need every minute I can get. I really like Annie Sloan chalk paint because it dries so quickly. Stir the paint when you first open it. If the paint is a little thick, just add some water and stir it to get a little thinner. I applied 2 coats on everything, and I let it sit again for a day. If you have time you can do everything faster, I just had other stuff to do.
Applying Soft Clear Wax:
This is pretty easy. Get yourself a good brush and apply the wax over the entire dresser and drawers. Then you will use your lint free cloth, and start buffing and wiping it off. Before you know it, you will see this lovely shiny finish on the dresser and drawers with a smooth finish. Love it.
Applying Minwax Wipe-on Poly:
I then went back to the top of the dresser and applied 3 coats of Minwax Wipe-on Poly on it. This way you protect your beautiful dresser from scratches and so on. You basically hand rub it on with a towel. It’s very easy to use.
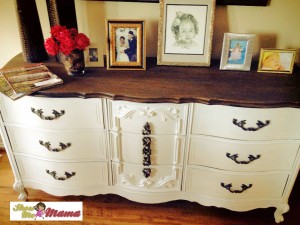
The reveal of my French Provincial Dresser/Buffet:
I love this dresser and I had fun doing it all. I hope you enjoy my tutorial, and paint an old looking piece of furniture into a gorgeous new piece of furniture too. Until next time! Enjoy.
Sincerely,
![]()
My opinions are my honest, and thoughtful views and were not influenced by any source. I was not compensated monetarily and was not provided any items for this post. This was my own experience and project.


8 Comments
Gorgeous… I have a house full of stuff that could benefit with new “happy” style. Amazing you do this with two Active children and the patiance to wait a day for each step.
Applause!!!!!
glad you are having fun decorating 🙂
That looks fantastic! Painting a dresser is a great way to give it a facelift.
OMgoodness…amazing! I need you to spend some time at my house 🙂
Oh my, what a great change! So pretty and bright looking…
That looks gorgeous. It is very similar to the bedroom furniture that I have!
WOW! it looks great with the black and white! i wish I had the skills to do stuff like that
What a creative idea!! Beautiful dresser!